Introduction to Trial Lenses
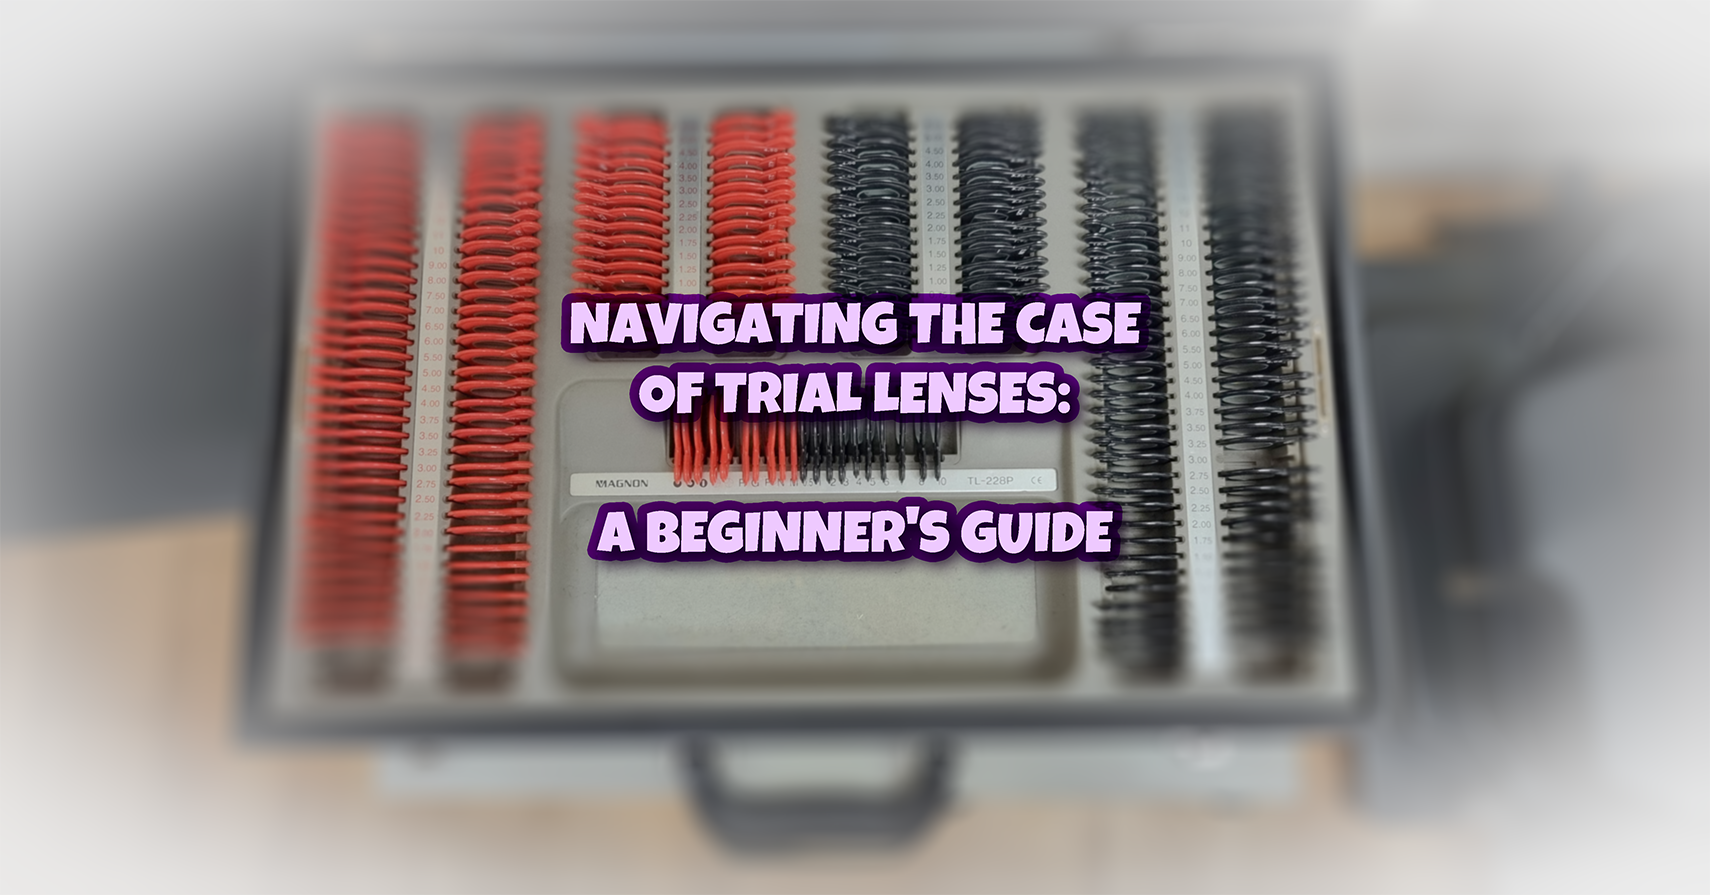
Trial lenses are essential tools for any optometrist or optometry student performing a refraction. They let you explore how different lens powers affect a patient’s vision. Using a trial frame, you place these lenses in front of the eyes to test and adjust prescriptions on the spot.
The trial frame adjusts to fit the patient comfortably and holds the trial lenses securely in place. By swapping lenses in and out, you find the right combination to correct issues like myopia (short-sightedness), hyperopia (long-sightedness), and astigmatism.
This hands-on approach to refracting the eyes is a great way to learn how each lens affects the eyes, whilst mastering the skills of refraction. Getting familiar with your trial set and the types and use of the different trial lenses will boost your confidence during eye exams. This will, in turn, help you provide better care to your patients.
Our guide to navigating the trial lens set is to show you where the lenses are in the trial set – but will not cover the process of refraction. Don’t forget to try the Skill Activity at the end to test your knowledge!
Spherical Trial Lenses
Spherical lenses are arguably the most important lenses in your trial lens set. They correct the general focus of the eye. There are two kinds: convex (plus) and concave (minus).
The spherical trial lenses run down either side of the trial set and are found in pairs. This pairing allows for each eye to be corrected by the same powered lens, should it be needed.
Convex Lenses (Plus Spheres)
Convex spherical lenses are thicker in the middle. They are used to correct for hyperopia (long-sightedness) and presbyopia (difficulties in adjusting vision from far to near). They are often located on the right hand side of the trial set (although this may vary by manufacturer). Always check you know which side to locate these lenses. These lenses will be labeled with a plus (+) sign on them.

The powers often range from +0.25 to +20.00 dioptres. From +0.25 to +4.00, they often change in 0.25 steps, and beyond +4.00 they increase in either +0.50 or +1.00 dioptre steps. The plus spherical lenses, will often have a black or green aperture casing, although thus too may differ between manufacturer.
Concave Lenses (Minus Spheres)
Concave spherical lenses are thinner in the center. They assist those who struggle to see far away (myopia). The lenses are often found on the left hand side of the trial set but, like mentioned above, this can vary between manufacturers – so always double check! These lenses will be labeled with a minus (-) sign.

Powers range from -0.25 to -20.00 diopters. Similar to the plus spherical lenses, they increase in in 0.25 steps up to -4.00, but beyond -4.00, they increase in -0.50 or -1.00 dioptre steps. The minus spherical lenses, will often have a red aperture casing, although thus too may differ between manufacturer – so make sure you don’t just rely on colour alone.
It is worth noting that the aperture casings indicate that the trial lenses are reduced aperture and the trial lenses that are held in by a metal rim are full-aperture trial lenses. Whilst these different types each have their pros and cons, these reasons are outside the scope of this article.
Cylindrical Trial Lenses
Cylindrical lenses correct astigmatism, which happens when the eye doesn’t focus light evenly due to an irregularly shaped cornea. These lenses bend light more in one direction than the other.
The cylinder trial lenses are found centrally, often towards the top portion of the trial set. They are adjacent to their respective spherical lens powers. Like the spherical lenses, they are found in pairs, which allows for the same powered cylinder lens to correct each eye if necessary.
Convex Cylinders (Plus Cyl)
These lenses curve outward along one axis and have a plus sign. The direction of this axis is labeled by line. By rotating these trial lenses in the trial frame, you find the right angle (axis) to sharpen the image and correct for the patient’s astigmatism.

Powers often range from +0.25 to +6.00 diopters, stepping up by 0.25 to +4.00 dioptres cylinder, before stepping up in +0.50 dioptres cylinder steps from +4.00 to +6.00. Adjusting the lens axis helps you fine-tune the orientation of the astigmatism during the refraction.
In UK optometry, it is often convention to work with the concave cylinders (minus cyl) and as such these lenses are often not used. They are included to allow people to work in plus cylinder if required and/or to combine with minus cylinder lenses to create cylinder powers that may not be available between steps.
Concave Cylinders (Minus Cyl)
These lenses curve inward along one axis and carry a minus sign. By rotating these trial lenses in the trial frame, you find the right angle (axis) to sharpen the image and correct for the patient’s astigmatism.

Powers range from -0.25 to -6.00 diopters cylinder, also increasing by 0.25 steps up until -4.00 dioptres cylinder. Adjusting the lens axis helps you fine-tune the orientation of the astigmatism during the refraction.
It is convention in the UK to work with minus cylinders. It is also worth noting that, like the spherical lenses, these lenses come in full-aperture and narrow-aperture variants.
Prism Trial Lenses
Prisms are unique components in your trial lens set that help assess eye alignment and binocular vision issues. Unlike lenses that adjust focus, prisms displace (shift the position of) images without changing clarity.
You will use these trial lenses in tests such as fixation disparity and Maddox rod.
These lenses are generally found towards the middle of the trial lens set and are usually adjacent to the special trial lenses (see below).
What Prisms Look Like
Prisms resemble flat lenses with one edge thicker than the other, creating a wedge shape. The thicker end is known as the base and the thinner end is known as the apex. The apex is directly opposite the base.

They are marked with their strength in prism dioptres and indicate the base direction. This is important as you will need to align the base in a given direction depending upon the ocular misalignment present.
In the image, the gradient indicates the glass is thicker towards the end labelled “B” as to represent the thickening of the lens towards the base. Always check how the base of your prism is labelled when using your trial lens set as labelling can vary between manufacturers and design.
In most full trial lenses sets, prisms range from 1 to 10 prism dioptres in strength.
Using Prisms
You’ll use prisms when testing for conditions like strabismus or phorias, where the eyes don’t align perfectly. By placing a prism in front of one eye, you can measure the amount of misalignment. Adjusting the prism strength helps you find the point where the eyes work together comfortably.
Special Trial Lenses and Tools
Your trial lenses set includes more than just standard lenses. There are special trial lenses and tools that help with specific tests and situations. They are often found in the middle of the trial lenses set and adjacent to the prisms.
Here is a quick guide to them.
Occluding Trial Lens

An opaque lens that completely blocks vision in one eye. It’s used during tests that require isolating one eye, such as when you are monocularly refracting an eye.
Pinhole
This trial lens has a small hole in the center. It helps determine if reduced vision is due to refractive errors or other issues. If vision improves when looking through the pinhole, it suggests that a change in prescription may help.

In some cases, it can also reduce the glare, improving the vision in people with media opacities, such as cataract. This can greatly assist in determining the acuity potential at the macula-level, even in the presence of cataract.
Plano Trial Lenses
These are trial lenses with no power—it’s flat with no curvature. These lenses can have multiple uses, but are often used with patients that are malingering (such as pretending there is a reduction in vision in order to be prescribed glasses). Utilising these lenses can give the illusion that lenses have been put into the trial frame and stimulate the patient to read further down the chart.

Another use of the plano lenses can be to help balance the weight in a trial frame, but this is now rarely required.
Frosted Lens
A frosted lens is translucent, diffusing lens that allows some light through but breaks up form.

It’s useful when you need to occlude one eye partially, reducing its input without completely blocking off the illumination it would receive. This helps in tests where full occlusion isn’t ideal.
Centration Cross Trial Lenses
This lens has a cross pattern etched on it. It’s used to check pupil alignment. By aligning the cross with the patient’s pupils, you can assess if the eyes are properly centered and aligned.

Whilst it is good practice to measure and input the patient’s monocular pupillary distance into the trial frame, this can help ensure the patient is looking through the optical centres. This is particularly useful prior to any binocular vision tests, such as Maddox rod or fixation disparity.
Stenopaeic Slit
The stenopaeic slit is a black disk with a narrow slit through it. It’s used to detect and measure astigmatism, especially in patients with poor vision.

By rotating the slit to different angles, you can change the size of the retinal blur, helping to isolate and identify the meridian with the highest degree of astigmatism.
Maddox Rod
The Maddox rod is a series of red or clear cylindrical lines that run parallel across the length of the trial lens. The lens turns a point of light into a line.

Placing this lens in front of one eye and leaving the other with the patient’s optical prescription, the patient can see if the line and the point of light are in alignment or not. By placing other prisms in front of the Maddox rod, you can then correct for any misalignment.
Red and Green Filter Trial Lenses
The red and green filter lenses can be used when assessing binocular vision, where each eye is dissociated by colour. This can be used to measure fixation disparity on electronic charts, for use with the Worth 4-Dot test or for helping to identify ocular dominance.


The Jackson Cross Cylinder

This tool is used in conjunction with the cylindrical trial lenses and is not considered a trial lens itself. I have an article/guide on the Jackson Cross Cylinder and how to use it – please click here for more details should you want to review this component.
Tips for Trial Lens Use
Here are a few tips on how to best use the trial set and to prevent issues with their use.
Organising Trial Lenses for Quick Access
Keeping your trial lenses organised is crucial. Always put lenses back exactly where you found them. It’s tempting to leave unused ones scattered around, but resist. Chaos will only slow you down and create stress later – as I explain in an anecdotal story from a few years ago.
Personal Story: Once, during a domiciliary visit, I accidentally dropped my portable trial set on the patient’s living room floor. The lenses scattered everywhere. Not knowing which lens went where made the refraction process take at least four times as long. It was like solving a jigsaw puzzle under pressure. That experience reinforced to me the importance of careful organisation.
Helpful Ways to Remember Lens Types and Uses
Create a mental map of your set. Categorise lenses by type and power in your mind. Use mnemonic devices or visual cues to quickly recall their positions and purposes. Take a photo of the one you use in clinic and draw a labeled diagram from it. If you know where each of the trial lenses are, you’ll spend less time looking for the lens and more time focusing on the procedure you are doing.
Keep Your Trial Lenses Clean
Always have a clean microfibre lens cloth close to the trial set. This will allow you to wipe away any fingerprints or smudges that may interfere with the refraction or binocular vision test that you are doing.
Routinely take the time to go through all the trial lenses and give the lenses a quick clean – as this will save you valuable time not having to clean those lenses during an eye exam.
Be Kind to Yourself and Others
Remember, examiners are very particular about lenses being returned to their correct slots after use. They have to reset stations and appreciate the courtesy. By putting everything back properly, you’re not just helping others; you’re making life easier for yourself too. Organisation reduces stress and helps you perform at your best.
Wrapping Up
Getting comfortable with your trial lenses takes time, but it’s worth the effort. The more you handle these tools, the more confident you’ll become during exams. Remember to keep things organised, put lenses back where they belong, and learn from any mishaps—like when I turned a simple refraction into a puzzle on a patient’s living room floor.
Why not put your knowledge to the test? Try organising your trial set or practice identifying lenses without looking at the labels. It’s a great way to build your skills. I have also included a skill activity below – just so you have another resource to help build your skills in identifying the key locations of the trial set.
If you found this guide helpful, consider subscribing to stay updated on new content. There’s always more to learn, and you won’t want to miss out when new tips are shared.
Skill Activity
Trial Lenses: What Have You Learned?
Please note – this post is for educational purposes only and not to be used to for self-diagnosis or treatment. If you have any concerns on your eyes or vision, please consult your optometrist. Some links on this page are affiliate links, which may provide a referral payment to The Eye Care Advocate if you subsequently purchase a product on the destination page.
Leave a Reply